Procedure
Important
This section is a fundamental building block of any SOP
The ‘Procedure’ section of an SOP should provide a detailed, step-by-step description of how to carry out the specific tasks or processes outlined in the SOP. This section should be clear, concise, and easy to follow, ensuring that personnel can perform the procedure consistently and accurately.
The content of the procedure section will vary considerably depending on the nature of the SOP.
Example content:
🧬 Bioinformatics QC Procedure
Example content from a bioinformatics SOP outlining the procedure for assessing the quality of Illumina sequencing data prior to downstream bioinformatics analyses.
Procedure
1. Receipt of sequencing files
Sequencing files are automatically imported onto the staging server upon completion of an Illumina sequencing run. The bioinformatics production server checks the staging server for completed runs every 10 minutes via a scheduled cron job. When a new completed run is detected, the production server automatically imports the files from the staging server to /mnt/data/raw/<SEQUENCER_ID>/<RUN_ID>/ and initiates the bioinformatics QC pipeline, which is implemented in Nextflow and maintained at https://github.com/lab-bioinformatics/qc-pipeline.
2. Executing the analysis
The bioinformatics QC pipeline can be executed in two modes:
Automated Mode: The pipeline is launched automatically via a cron job when a new sequencing run is copied from the staging server.
Manual Mode: A user can manually initiate the pipeline on a selected set of FASTQ files.
2.1 Manually launching the pipeline
Note
Manual mode should only be used where a run has failed because of a server issue (e.g. a power cut that stopped the analysis part way through). Manual mode can only be initiated by a member of the bioinformatics team as access to servers is restricted.
To restart a failed run:
Log into the production server using an ssh client and switch to a user profile with appropriate permissions:
ssh username@10.0.1.12
sudo su - prod-user
Access to the server is restricted and can only be made from within the laboratory network. Users must either be connected via a wired network connection or have an active VPN session to reach the server.
If the samples were sequenced in-house, navigate to the directory for the relevant sequencing run by changing into the appropriate path, for example:
Once in the directory, verify that FASTQ files are present by listing them:
This command will display all FASTQ files in the directory. If no FASTQ files are found, first check whether the sequencing run has completed. If the run has finished and no FASTQ files are present, the sequencing run or the file transfer may have failed. In this case, refer to SOP045: Using the NextSeq 550 for further guidance.
If FASTQ files are present for all expected samples within a run, you are ready to run the QC pipeline on them. To manually initiate the bioinformatics QC pipeline on the FASTQ files, run the following command from within the run-level directory:
The QC pipeline will now be submitted to the production job queue. Because Nextflow launches one Slurm job per process (or per task if parallelised), multiple jobs will appear in the queue. The status of these jobs can be monitored using:
Once sufficient compute resources become available, the job scheduler will start the pipeline. The scheduler is configured so that jobs allocated to the production queue are prioritised; therefore, the QC pipeline should normally commence within a few minutes, depending on resource availability.
3. Pipeline overview
The bioinformatics QC pipeline completes the following steps:
FASTQ files are paired based on their name using pattern matching to identify which samples are “forward” and which are “reverse”.
The workstream associated with each pair of FASTQ files is identified based on the sample name (e.g. FLU for the flu workstream, SARS for the SARS CoV 2 workstream).
Metadata including run ID, flowcell ID, and instrument ID are extracted from FASTQ files.
A check is performed to determine whether a directory for that run already exists within the relevant workstream folder (e.g.
/mnt/data/analysis/flu/<RUN_ID>/); if not, one is created.A backup copy of the raw sequencing data is created on cold storage (
/mnt/archive/raw/<SEQUENCER_ID>/<RUN_ID>/).Cutadapt and FastQC (via the Trim Galore! wrapper) are run, producing trimmed FASTQ files and QC reports, which are stored in the qc subfolder.
The trimmed FASTQ files are screened using Centrifuge against a reference database of human, bacterial, viral, and archaeal genomes.
A graphical representation of sample content is generated using Krona, based on Centrifuge output.
All QC outputs (from Cutadapt and FastQC) are collated into a single report using MultiQC (
/mnt/data/analysis/<WORKSTREAM>/<RUN_ID>/qc/multiqc/).Run level and per sample entries are created in the AutoQC database.
Once the analysis has completed, results are written to workstream specific subdirectories under the qc folder: /mnt/data/analysis/<WORKSTREAM>/<RUN_ID>/qc. Within this directory, the following subdirectories are generated:
MultiQC Report
/mnt/data/analysis/<WORKSTREAM>/<RUN_ID>/qc/multiqc/
Contains the consolidated QC summary (multiqc_report.html), which collates metrics across all workstream specific sequencing files processed in the run.
Trimmed Reads
/mnt/data/analysis/<WORKSTREAM>/<RUN_ID>/qc/trimmed_reads/
Contains adapter trimmed FASTQ files. These cleaned reads are suitable for downstream analyses such as alignment, variant calling, or further project specific workflows.
Centrifuge Report
/mnt/data/analysis/<WORKSTREAM>/<RUN_ID>/qc/centrifuge/
Contains a graphic report summarising the species assignments of reads that could be classified using Centrifuge.
4. Checking samples have passed QC
Once the QC pipeline has completed, the final step is to verify whether each sample has met the laboratory’s minimum quality standards. While the pipeline writes result files to /mnt/data/analysis/<WORKSTREAM>/<RUN_ID>/qc/, this verification is performed through the AutoQC database, which collates and stores QC metrics for every sequencing run. The database acts as a gatekeeper for downstream bioinformatics workflows, ensuring that only samples which pass QC thresholds are released for further analysis.
4.1 Accessing the AutoQC database
The AutoQC database is hosted on the laboratory’s datastore and can be accessed through a secure IP address. Access is restricted to connections made from within the laboratory’s internal network or via an approved VPN session. To connect, open a web browser and navigate to: http://10.0.2.25/autoqc.
Once the login page is displayed, enter your assigned user credentials to access the database. After logging in, the duty bioinformatician must review the QC status of all samples associated with the sequencing run. AutoQC automatically applies pass or fail flags based on predefined quality thresholds, including read depth, base quality scores, adapter contamination, and the proportion of human reads detected. Samples that meet all thresholds are marked as QC Pass and require no further action.
4.2 Assessment of failed runs / samples
For samples flagged as QC Fail, the duty bioinformatician is responsible for examining the detailed QC metrics to confirm the reason for failure. This involves reviewing outputs from MultiQC and Centrifuge to check whether project specific QC thresholds (Appendix 1) have been met. A sample is considered to have failed if:
The magnitude of reads assigned to the expected organism is lower than the minimum threshold specified for that project sample type (Appendix 2).
The average read length post trimming is shorter than 150 bp.
The per base N content exceeds 0.5%.
The average per base quality is lower than Q30 for the first 150 bp of the reads.
4.3 Gatekeeping mechanism
AutoQC functions as a gatekeeper by controlling the release of samples into downstream workflows. Only those marked as QC Pass are added to the whitelist for further bioinformatics processing, while failed samples are held back automatically. This mechanism ensures that downstream analysis is initiated exclusively on validated, high quality datasets, maintaining the integrity of laboratory outputs and preventing wasted compute resources.
4.4 Escalation of QC failures
In addition to database annotation, the duty bioinformatician must notify the wider laboratory team when a run contains failed samples. This is achieved by sending a message on Slack to the “sequencing” channel, summarising the run ID, the number of failed samples, and the reasons for failure. This communication ensures that sequencing staff within the laboratory can promptly take corrective action, such as scheduling resequencing or investigating potential problems with library preparation or instrument performance.
👩🔬 Staff Training Procedure
Example content from an SOP outlining a training procedure
Procedure — Tell, Show, Do, Apply Model
1. TELL — Base Knowledge / Preperation
Trainer/Coordinator must ensure that trainees:
Receive all required reading/viewing materials before training
Understand the purpose and context of the procedure they will learn
Review any relevant SOPs, manuals, policies, or background documentation
Demonstrate awareness of responsibilities (e.g., preventative maintenance, data handling, environment preparation) where applicable
Trainees build foundational understanding before hands-on training begins.
2. SHOW — Trainer Demonstration
Trainer:
Demonstrates the complete procedure from start to finish
Explains the rationale behind each step
Highlights critical points, risks, and common troubleshooting issues
Uses the relevant operational SOP (topic-specific) as the demonstration guide
Demonstrates proper maintenance, environment setup, or preparatory actions as applicable
The trainee observes, asks questions, and records notes.
3. DO — Performance Under Supervision
Trainee:
Performs the demonstrated procedure under direct observation
Follows all steps as shown in the SHOW stage
Practices using tools, equipment, or systems relevant to the topic
Performs any required maintenance tasks associated with the procedure
Trainer:
Observes the trainee’s performance
Documents success or failure to meet criteria
Provides feedback and corrective guidance
Delivers remedial training if needed
4. APPLY — Independent Competency Assessment
Trainee:
Performs the procedure independently, without supervision
Produces outputs or results to be assessed against predefined criteria
Demonstrates understanding of workflow logic, parameter choices, documentation, or safety steps (as applicable)
Trainer:
Reviews trainee outputs and evaluates competency
Records success/failure on the Training Form or rubric
Provides feedback and prescribes further practice if needed
Reassesses until competency is achieved
5. Review, Attestation, and Close-Out
Trainee signs the Training Form to attest that training was completed
Trainer signs to verify performance
QA Officer or Approver (if required) reviews the documentation
Training Coordinator files all documents in the designated training records repository
The Training Matrix is updated to reflect completed training
🌌 Galaxy Training Procedure
Example content from a training SOP detailing the standardised procedure for training on the Galaxy platform
Procedure
This section describes the step-by-step process for delivering training on developing and executing analysis workflows using the Galaxy platform. Training is delivered using the Show → Do → Apply instructional model to ensure progressive skill acquisition and demonstrable competency.
1. Preperation (Training Coordinator + Trainer)
1.1 Training Coordinator Responsibilities
Schedule training session(s), confirm venue or virtual setup.
Ensure all trainees have active Galaxy accounts (institutional instance or TIaaS).
Confirm resource availability (internet access, classroom laptops, temporary accounts if needed).
- Upload or prepare training materials:
Example datasets (FASTQ/tabular files or equivalent),
Training slides/handouts,
Quick-reference sheet for Galaxy tool categories and parameters,
Competency checklist and feedback forms.
Ensure prerequisites are met (see Training Requirements section).
1.2 Trainer Responsibilities
Perform a “dry run” of the training workflow to confirm all tools are available and functional.
- Test the Galaxy instance for:
Tool panel availability
Workflow editor functionality
Dataset upload limits
Job execution responsiveness
Prepare a clean example history and optional template workflow for demonstration.
1.3 Outputs
Training session plan
Verified toolset availability
Example history/workflow ready for demonstration
Dataset folder prepared and accessible
2. SHOW - Trainer Demonstration (Observation)
The trainer performs a live demonstration, first introducing the trainee to Galaxy’s core components and essential platform operations, including navigation, dataset handling, and tool execution. The demonstration then progresses to the workflow-development process, illustrating how to build, edit, run, and manage reproducible analysis workflows. The trainer performs all relevant steps while the trainee observes and verbally explains the process from beginning to end, using the operational SOP as a training guide.
2.1 Introduction to the Galaxy Environment
Trainer demonstrates:
Registering and logging in to the Galaxy instance
- Navigating:
Tool panel
History panel
Main analysis workspace
Workflow menu
- Basic Galaxy concepts:
Histories: creating and renaming a new history, uploading files to a history
Datasets
Tools
Inputs/outputs
Job execution and monitoring
2.2 Uploading and Inspecting Data
Trainer demonstrates how to:
Upload example datasets using the Upload Data tool
Verify and adjust dataset datatype
View dataset metadata and preview content
Apply dataset tags, annotations, and good naming conventions
2.3 Running Tools in Galaxy
Trainer demonstrates a minimal analysis chain using existing tools (dataset-neutral), such as:
Running a QC tool
Performing a simple filtering or mapping step (as appropriate for the dataset used)
Reviewing tool parameters
Inspecting outputs and metadata
Monitoring job progress and identifying failed jobs
2.4 Building a Workflow by Connecting Tools (Manual Construction)
The trainer demonstrates how to manually construct a workflow using the Galaxy Workflow Editor. This introduces trainees to the logic of assembling analysis steps into a reproducible sequence before learning automated extraction.
Trainer demonstrates:
Navigating to Workflows → Create New workflow
Assigning a meaningful workflow name
Opening the Workflow Editor
Searching for tools in the tool panel
Adding tools into the editor canvas
Connecting tool outputs to subsequent tool inputs
Adjusting tool parameters (e.g., datatype expectations, filters, reference selections)
Reordering modules to improve readability
Adding annotations describing the purpose of each step
Saving the workflow
Key teaching points:
Why connecting tools manually improves understanding of workflow logi
How tool outputs influence downstream inputs
How parameter defaults affect reproducibility
Common mistakes (wrong connection types, missing inputs, incompatible datatypes)
2.5 Extracting a Workflow from a History
Trainer shows how to:
Extract a workflow from the history (History → Extract Workflow)
Name the workflow meaningfully
Remove unnecessary steps
Save the workflow
2.6 Editing Workflows Manually
Trainer demonstrates:
Opening the Workflow Editor
Adding tools from the tool panel
Connecting tool inputs and outputs
Modifying default parameters
Reordering modules for readability
Adding annotations (purpose, assumptions, expected outputs)
Saving workflow updates
2.7 Running the Workflow
Trainer runs the workflow to illustrate:
Selecting input datasets
Adjusting runtime parameters
Executing and monitoring workflow jobs
Inspecting final outputs
Interpreting whether results match expectations
Documenting deviations or errors
2.8 Sharing, Exporting, and Versioning
Trainer demonstrates:
Sharing workflows (links, permission settings)
Exporting workflows (.ga file)
Creating new workflow versions and documenting changes
2.9 Data Management Hygiene
Trainer emphasises:
Proper dataset naming
Tagging datasets and histories
Purging unnecessary intermediate files
Keeping one “gold” history
Adding README-style documentation within Galaxy
2.10 Outputs of SHOW phase
Trainer demo history
Trainer demo workflow
Trainee observation notes
3. DO – Performance Under Supervision
Trainees now replicate the steps demonstrated in the SHOW phase, with real-time guidance and troubleshooting by the trainer. The goal is to reinforce understanding, identify gaps early, and ensure trainees can follow the workflow logic.
3.1 Trainee activities
Upload example datasets independently
Run the same set of tools demonstrated in the SHOW phase
Check datatype assignment and correct if needed
Reproduce the analysis chain and inspect outputs
Extract a workflow from their history
Edit the workflow in the Workflow Editor
Apply dataset tags, annotations, and documentation
3.2 Trainer responsibilities
Monitor tool execution and support troubleshooting
Ensure trainees understand:
Purpose of each step
Why the tool order matters
What constitutes valid vs invalid outputs
Provide guidance on workflow structure, parameter defaults, and good documentation practices
Record trainee challenges in preparation for the APPLY phase
3.3 Outputs of DO phase
Draft trainee workflow
Trainee history containing tool runs
Trainer notes on competency gaps
4. APPLY - Independent Application & Competency
The trainee must now demonstrate independent proficiency using a dataset and workflow relevant to the training module.
4.1 Trainee responsibilities
Independently produce a complete, reproducible workflow by:
Designing the workflow logically
Adding tools in the correct order
Configuring parameters appropriately
Running the workflow end-to-end
Documenting parameter decisions within the workflow/editor
Exporting the final workflow (.ga)
Organising their history and tagging datasets
- Submitting:
Final workflow file (.ga)
Documented history
Notes on workflow logic or parameter choices
4.2 Trainer responsibilities
- Assess the submitted workflow according to the competency checklist:
Logical tool order
Correct use of inputs/outputs
Parameter correctness and documentation
Reproducibility of outputs
Clear annotations and naming conventions
Provide feedback and remediation if required
Record competency status in the training matrix
5. Optional Advanced Modules (Trainer’s Discretion)
Depending on trainee progress, the trainer may introduce additional topics such as:
Conditional workflow steps
Dataset collections
Using subworkflows
Batch execution
Parameter sweeping
Basic troubleshooting strategies
Introduction to workflow version control using external repositories (e.g., Git)
6. Feedback and Evaluation
Trainees complete the post-training feedback form
Trainer reviews all trainee outputs and finalises competency records
Training Coordinator compiles session feedback summary
QA Officer reviews documentation for completeness and signs off training completion
Records stored in the designated QMS/SharePoint directory
🧪 Laboratory Procedure
Example content from a wet-lab SOP outlining the procedure for preparing sequencing libraries using the Illumina DNA Prep kit.
Procedure
1. Run Setup & Documentation
1.1 Run ID Formatting
When preparing a sequencing run, a unique Run ID must be generated to ensure proper tracking and documentation.
Format:
<Date>-<Workstream>-N<Number of samples>
Example:
If a library is prepared for 32 HIV samples, including a no-template control (NTC), on the 8th of March 2025, the Run ID is: 2025-03-08-HIV-N32.
1.2 Index Set Selection
Consult the UDI Indexing Log (SOP 084F2) to determine which index set (1–16) is required. Record the Run ID on the chosen index set within the index log.
2. Plate Map & Sample Organisation
For each sequencing run, a plate map must be generated to document sample placement.
Requirements:
Record the Run ID clearly at the top of the plate map.
Assign each sample to a specific well position.
Order samples sequentially, starting from A1 and continuing acoss each row.
Place controls (including NTCs) in designated wells, typically at the end of the plate, to ensure consistent placement across runs.
File storage:
Save a copy of the completed plate map in <<LOCATION>>, using the Run ID as the filename.
3. Reagent Preperation
Referring to Table 1 and BenchAid 085, prepare the following reagents:
BLT
TWB
TB1
TSB
EPM
Record reagent lot numbers and expiration dates of all reagents in the NGS reagent database [REF].
Item |
Storage temperature |
Instructions |
|---|---|---|
BLT |
2°C to 8°C |
Bring to room temperature. |
TWB |
2°C to 8°C |
Bring to room temperature. Once kit is in use, leave at room temperature.Once kit is in use, leave at room temperature. |
TB1 |
-25°C to -15°C |
Bring to room temperature. |
TSB |
2°C to 8°C |
Bring to room temperature. If precipitates occur, vortex and heat to 37°C until dissolved. One kit is in use, leave at room temperature. |
EPM |
-25°C to -15°C |
Thaw in the fridge. Leave in the fridge until use. |
4. Tagmentation (FLEXTAG)
4.1 Programme Setup
Load the FLEXTAG programme on the Veriti thermocycler.
Leave the programme on hold until all samples and reagents are ready for processing.
4.2 TAG mix preperation
Vortex BLT (30s) and TB1 (pulse spin). Prepare the Tagmentation (TAG) Mix in a reservoir as follows, mixing well with a pipette:
BLT: 7 µl per sample
TB1: 7 µl per sample
4.3 Sample Loading
Label a semi-skirted plate with the run ID followed by “-TAG”.
For viral amplicons (HIV, Flu): Shake PCR product plate at 1800 rpm for 2 minutes using the plate shaker. Centrifuge at 3000 rpm for 30 seconds. Dilute sample 1:3 by adding 10 µl sample to 20 µl nuclease‑free water to the labelled semi-skirted plate. Mix by pipetting 10 times or shake at 1600 rpm for 1 minute.
For COVID samples: Shake PCR plates A and B at 1800rpm for 2 minutes on using the plate shaker. Centrifuge at 3000 rpm for 30 seconds. Add 10 µl of sample from PCR Plate A, 10 µl of sample from PCR Plate B, and 10 µl nuclease‑free water to the labelled semi-skirted plate. Mix by pipetting 10 times or shake at 1600 rpm for 1 minute.
For bacterial samples: Shake extract plate at 1800rpm for 2 minutes using the plate shaker. Centrifuge at 3000rpm for 30 seconds. Place plat on magnet for 5 minutes to remove silica from the extraction. Add 30µl of neat sample to the labelled semi-skirted plate.
Add 10 µl TAG Mix to each sample. Pipette once to dispense, shake (1600 rpm, 1 min), then seal plate.
4.4 FLEXTAG programme execution
Load plate onto the Veriti thermocycler.
Skip hold top initiate FLEXTAG.
Runtime: 15 minutes.
Once FLEXTAG programme has completed, remove plate from the Veriti thermocycler and centrifuge at 3000rpm for 30 seconds.
5. Stop Reaction (FLEXSTOP)
5.1 TSB Preperation
Vortex and pulse spin TSB.
Aliquot required volume (at least 7 µl per sample) into a reservoir.
5.2 FLEXSTOP Execution
Start FLEXSTOP programme on the Veriti thermocycler and leave on hold.
Add 5 µl of TSB to each sample.
Seal plate and shake at 1600rpm for 1 minute.
Load plate into the thermocycler and skip hold to initiate FLEXSTOP.
Runtime: 15 minutes.
5.3 Index Plate Handling
Note
This is a parellel task
While FLEXSTOP is running:
Remove required index plate from freezer.
Thaw at room temperature.
Shake at 1600rpm for 1 minute.
Centrifuge at 3000rpm for 30 seconds.
Record Index lot number and expiry date on the DNA Prep Worksheet.
6. Pre-Amplification Cleanup
6.1 Post-FLEXSTOP Handling
Remove plate from thermocycler.
Centrifuge at 3000 rpm for 30 seconds.
Start FLEXPCR programme and leave on hold.
6.2 Bead Binding & Wash
Mix TWB and aliquot required volume (at least 210 µl per sample) into a reservoir.
Place plate on magnet for 3 minutes.
Remove and discard the supernatant with a multichannel pipette without disturbing the beads.
Remove from magnet.
- Commence first wash as follows:
Add 100 µl of TWB, then pipette (10x) to gently mix.
Place on magnet for a further 3 minutes.
Remove and discard the supernatant as before.
- Commence second wash as follows:
Add 100 µl of TWB, then pipette (10x) to gently mix.
Place on magnet for a further 3 minutes.
Important
After the second wash, keep plate on magnet with supernatant on until the PCR mix is ready.
7. PCR-Amplification (FLEXPCR)
Start FLEXPCR programme on the Veriti thermocycler and leave on hold.
Remove EPM from fridge. Invert to mix and pulse spin.
Make up PCR mix as follows:
Volume per sample
EPM
14 µl
Nuclease-free water
14 µl
Using a 20 µl multichannel pipette, remove all the supernatant being careful to not disturb the beads.
Remove plate from magnet and add 20 µl of PCR mix to each sample.
Add 5 µl of index to each sample.
Seal plate and place on shaker at 1600rpm for 1 minute.
Load plate into the thermocycler and skip hold to initiate FLEXPCR.
Runtime: 15 minutes.
Note
Safe Stopping Point! The plate can be left on the thermocycler overnight or the plate can be sealed and stored at 2-8°C. Do not freeze.
💻 Code Update & Review Procedure
Example content from an SOP outlining the procedure for updating and reviewing code within the Luma Genomics Unit (LGU).
Procedure
1. Overview of the Procedure
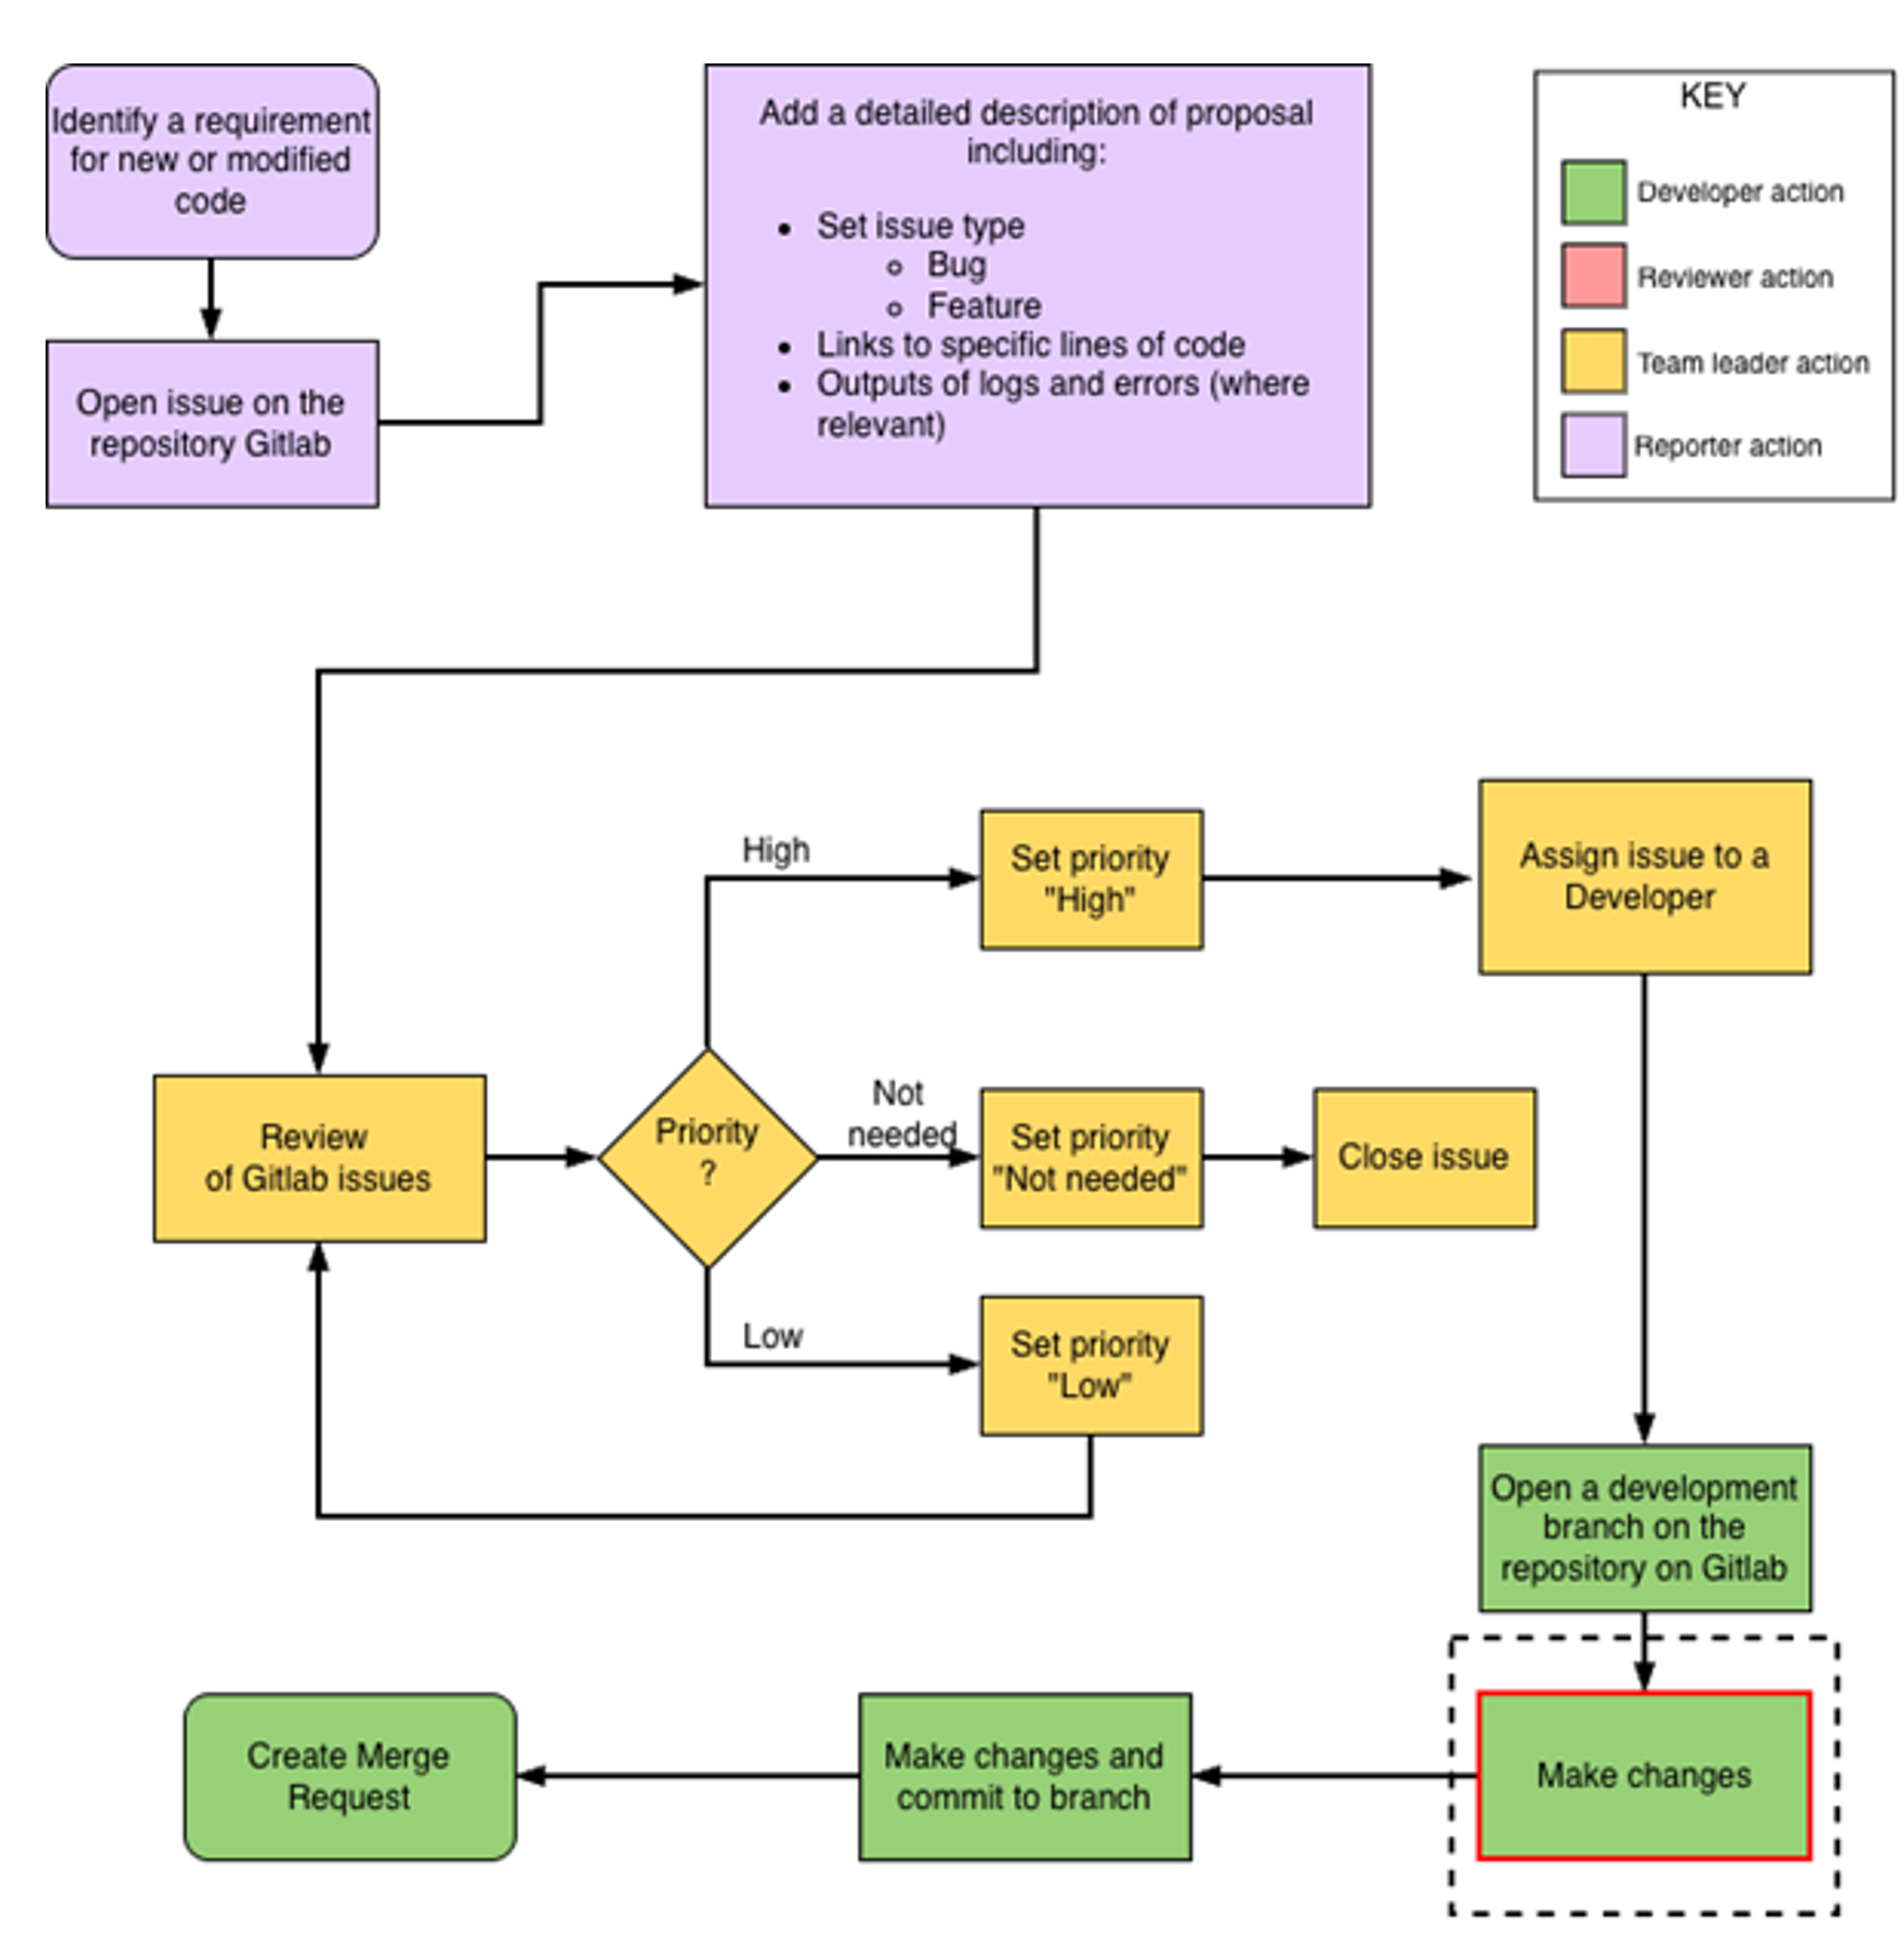
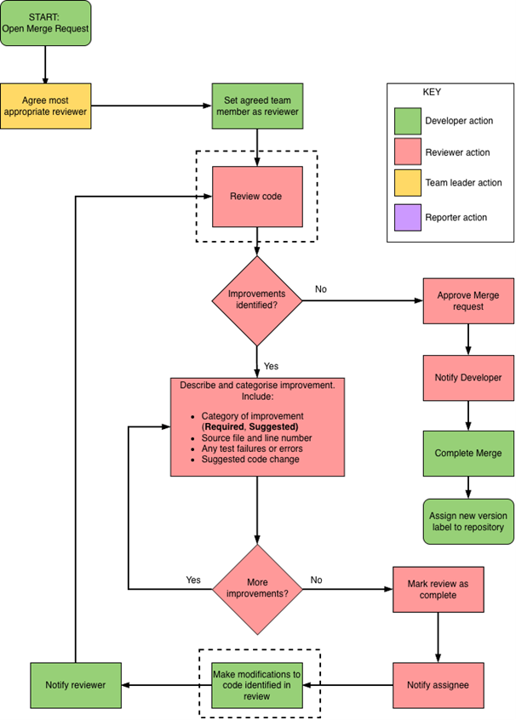
An overview of the procedure is given in the two schematics below. The actions surrounded by a dotted boxed line involve writing and reviewing code, and should be done with reference to the guidelines and supporting documents laid out in Appendix 1.
Schematic 1: Process by which requirements for new or modified code are raised and reviewed
Schematic 2: Process by which code changes are made, reviewed and approved
2. Roles and Actions
Actions in the process are performed by roles. One person may assume different roles at different stages of the process subject to constraints.
Role |
Team members who can assume roles |
Responsibilities |
|---|---|---|
Reporter |
Anyone |
|
Developer |
Anyone, but Developer and Reviewer must be different people for an issue |
|
Reviewer |
Anyone, but Developer and Reviewer must be different people for an issue |
|
Team leader |
Team leader (Lead developer in their absence) |
|
3. Classifying Reviewer Improvement Requests
During code review, reviewers should comment on the places where code can be improved, and distinguish between the required and suggested improvements. Those that are specified as required improvements will need to be implemented as a post-review action before the code can be merged; suggested improvements can be made at a later stage as they describe ‘good practice’ rather than functional changes.
To distinguish between required and suggested changes, the reviewer should begin review comments with a code, as described in the following table.
Type of Improvement |
Code Examples |
|---|---|
Required (R) |
|
Suggestion (S) |
|
4. Use of GitLab in the process
The version control system (VCS) used at LMU to implement this process is GitLab. Here we describe in detail how the roles in the process interact with GitLab to perform the actions.
4.1 GitLab Issue Fields: Issue Types and Priorities
GitLab issue fields are used to categorise issues and form an important part of the review process. The fields/values used at LGU are as follows:
Field |
Value |
Definition |
|---|---|---|
Issue Type |
Bug |
A problem affecting how code works |
Issue Type |
Feature |
A suggestion for an improvement |
Priority |
High |
An issue that needs to be worked on immediately |
Priority |
Low |
An issue that needs to be addressed, but is non‑urgent and not scheduled immediately |
Priority |
Not needed |
An issue that is not needed |
4.2 Developer Tasks
Login to GitLab (in web-browser).
In GitLab, navigate to the required repository.
Using the command line, clone the GitLab repository or individual branch.
First, copy the repository URL using the clone dropdown on the Project overview page on the GitLab website, then change directory into the location you want to store the code and type one of the following commands depending on your requirements:
git clone <remote-repo-url>
git clone --branch <branchname> <remote-repo-url>
Create a new development branch:
git checkout -b <branchname>
Edit the code, ensuring that guidelines referred to in Appendix 14.1 (and supporting documents) are adhered to.
Test the changes using the appropriate data and environment.
Stage the edited files for commit to the branch:
git add <edited_file_name>
Commit the changes to the local repository branch:
git commit -m "[basic message describing code changes]"
When writing a git commit message:
Limit the subject line to 50 characters
Capitalise the subject line
Use the imperative mood in the subject line (e.g. “Remove deprecated methods” rather than “Removed deprecated methods”)
Push the changes to the remote repository:
git push -u origin <branch_name>
Go to the GitLab website to submit a merge request between the edited branch and the main version.
Select the source and target branches
Source: updated (and tested) code branch
Target: master branch
Click Compare branches + continue
Fill in the title for the change
Add the content of the GitLab Merge Request template from Appendix 14.2.1 to the description
Set yourself as the Assignee
Once a Reviewer has been agreed, assign them to the merge request under Reviewer
Edit the Merge Request description text, replacing or removing template text as appropriate
Click Submit merge request
Any line-by-line and general comments made on previous commits will be displayed on the merge request page.
Any further general comments should be made on the merge request page within the relevant section of the review checklist template by selecting the check-boxes or clicking Edit.
Any further line-by-line comments can be made by clicking on Changes and adding insightful comments, or by clicking on Commits and adding them to the relevant commit.
Notify the Reviewer of the merge request. Link the Reviewer to the merge request for review.
Once the Reviewer has reviewed the code, they will inform you of any additional comments and changes required. This may take the form of multiple rounds of review, changes, and testing.
Once these actions have been resolved and the Reviewer has agreed that the branch is ready to merge into master, they will tick Approve and inform you.
Complete the merge by clicking Merge.
Finally, assign a new version to the master branch (which now incorporates the changes).
4.3 Reviewer Tasks
The code Reviewer will be notified of a new merge request to review by the Developer.
Log in to GitLab.
Click on Merge requests in the left-hand sidebar.
Click on Assigned to you.
Click on the relevant branch name of the merge request.
Assess the request and confirm you are competent to review; notify the Team Leader if you feel you do not have the knowledge/skills for this review.
Pull the updated development code from GitLab and run any tests as agreed.
Follow the steps outlined in steps 3–5 of the Developer tasks above to clone the repository or branch.
If the repository or branch is already cloned in a suitable testing location, checkout into the latest/finalised version of the working branch:
git checkout <name_of_branch_for_review>
Review the code highlighting improvements according to LGU guidelines and standards (see Appendix 14.1 and supporting documents).
If you find an improvement that relates to specific lines of code, add a GitLab comment to the related lines in the Changes tab of the merge request.
Start the comment with ([Type][Index]) e.g. for the third required improvement found:
(R3) This code is unreadable …
If you are making several comments at once, use the Start a review button to group comments with a final post.
When you have completed your review, populate the end-of-review comment using the GitLab Merge Request – Reviewer template (Appendix 14.2.2), and notify the Developer of the completion of the review.
The Developer will address improvements by pushing new changes to the code and commenting on the improvement raised.
You may need to repeat multiple rounds of review going back and forth between Reviewer and Assignee. In each round continue numbering the code improvements from where the last round ended. For example, a second round of review might start with a new required improvement R15.
Testing as part of Review
The Reviewer is responsible for reviewing test results, suggesting missing tests for the Developer to satisfy, and running tests if agreed.
These may take the form of:
A testing suite
Suggested tests provided by the Developer
Tests chosen by the Reviewer that they deem appropriate to assure the quality of the code
Tests in an environment appropriately similar to that of the production environment to confirm updated code is functioning as expected prior to code review request.
Review the checklist comments on the merge request Merge Request Assignee Overview.
If the code passes code quality assurance and operational testing, state in the checklist comment box that the code was reviewed, and where appropriate tested and worked as expected. Complete all reviewer sections of the template.
Click Approve the merge and inform the Assignee on Slack who will complete the merge.
If the code fails operational testing, in the appropriate section of the merge review comment, write:
  (R#) - When testing the code, the following error occurred: <the error message>

Testing failures always result in required changes. You may provide information on what has caused the error and a possible solution if you are able to identify these easily.
Notify the Developer so they can correct, test, and commit their code. Another review cycle will then start.